Jetson Nano Bootstrap
Source: .../compute_setup/jetson/README.md
Helpful guides on how to install the ROS 2-ready system on the Jetson Orin Nano. The following instructions utilize an SSD to flash the Nano image. We recommend at least a 1 TB SSD installed into the NVMe SSD slot on the bottom of the Jetson.
Table of contents
- Flashing JetPack to the device
- Increasing performance
- Fixing Chromium
- Installing ROS 2
- Installing necessary system packages
- Switch desktop to XFCE
- Configure ports on the joystick controller and Arduino
- Configure ROS workspace
- Install Arduino IDE
- Flash Arduino with code
- Adding the screen
- Start ROS nodes automatically
Flashing JetPack to the device
Follow the official instructions available from NVIDIA. We recommend using the instructions in the Alternative method: SDK Manager section.
We suggest using JetPack 6.1.X. The host computer used to flash the Jetson must run Ubuntu 20/22.
After flashing, boot the device, and proceed to set up a user name and password. We recommend naming the device jetson. For ease of use, we recommend setting the device to auto-login. Do not install the Chromium browser.
Skip Chromium during first-boot setup — the default package source is broken (see Fixing Chromium below for a working install method).
Increasing performance
Follow the instructions from NVIDIA to switch the device to MAXN SUPER mode, which will operate the device with up to 25 W of power.
Fixing Chromium
By default, the default source for the Chromium web browser is broken. Use the following commands to get a working version.
sudo apt update
sudo apt install flatpak
flatpak remote-add --if-not-exists flathub https://dl.flathub.org/repo/flathub.flatpakrepo
flatpak install flathub org.chromium.Chromium
Installing ROS 2
sudo apt update
sudo apt install -y curl gnupg2 lsb-release build-essential
sudo curl -sSL https://raw.githubusercontent.com/ros/rosdistro/master/ros.key -o /usr/share/keyrings/ros-archive-keyring.gpg
echo "deb [signed-by=/usr/share/keyrings/ros-archive-keyring.gpg] http://packages.ros.org/ros2/ubuntu $(lsb_release -cs) main" | \
  sudo tee /etc/apt/sources.list.d/ros2.list > /dev/null
sudo apt update
sudo apt install -y ros-humble-desktop
source /opt/ros/humble/setup.bash
echo "source /opt/ros/humble/setup.bash" >> ~/.bashrc
source ~/.bashrc
Install Visual Studio Code
cd ~/Downloads
wget https://update.code.visualstudio.com/1.77.3/linux-deb-arm64/stable
sudo dpkg -i stable
Installing necessary system packages
sudo apt install -y \
  python3-colcon-common-extensions \
  python3-rosdep \
  python3-vcstool \
  python3-pip \
  git \
  nano \
  htop \
  nvidia-cuda \
  nvidia-tensorrt \
  nvidia-opencv \
  terminator \
  libhidapi-dev
JTOP is the recommended system monitoring tool for processor/GPU performance. It must be installed with sudo.
sudo pip3 install -U jetson-stats
Creating a colcon workspace
mkdir -p ~/ws/src
cd ~/ws
colcon build
We also add a utility command to assist with rebuilding the repo:
echo "alias build_ros='cd ~/ws && colcon build && source install/setup.bash'" >> ~/.bashrc
Switch desktop to XFCE
By default the desktop on the Jetson consumes around 1 GB of RAM during idle operation. We can improve that by switching to a lightweight desktop.
sudo apt-get install xfce4
After installing, log out, then when you log back in select the gear icon near the login button to change the desktop session to xfce. This change will persist the next time you log in.
Configure ports on the joystick controller and Arduino
Follow the dedicated USB device rules guide to set up the various required and optional device connections.
Configure ROS workspace
Move into the ROS workspace, clone necessary packages, and build the repo.
cd ~/ws/src
git clone git@github.com:SPROUT-MITLL/sprout_ros.git # Install SPROUT ROS
git clone -b ros2 git@github.com:SPROUT-MITLL/ds5_ros.git # SPROUT fork of DS5 driver
cd ~/ws
colcon build
source ../devel/setup.bash
Install Arduino IDE
These instructions will download an app image containing the Arduino IDE for an ARM64 device.
cd Downloads
wget https://github.com/koendv/arduino-ide-raspberrypi/releases/download/2.2.0/Linux_arm64_app_image.zip
unzip Linux_arm64_app_image.zip
chmod +x arduino-ide_2.2.1_Linux_arm64.AppImage # Make the app image executable
./arduino-ide_2.2.1_Linux_arm64.AppImage # Run the app image
Allow the application to initialize and install necessary packages upon first system boot. The Encoder package is the only non-default package required to compile the sketch.
Flash Arduino with code
Connect the Arduino to the Jetson via USB cable.
Open the Arduino sketch: ~/ws/src/sprout_ros/arduino/vine_control/vine_control/vine_control_uno_rev3
Make sure the IDE is connected to the Arduino Uno on /dev/ttyACM0. Verify and upload the sketch to the device.
Once Upload Finished is displayed, the device is ready to use!
Adding the screen
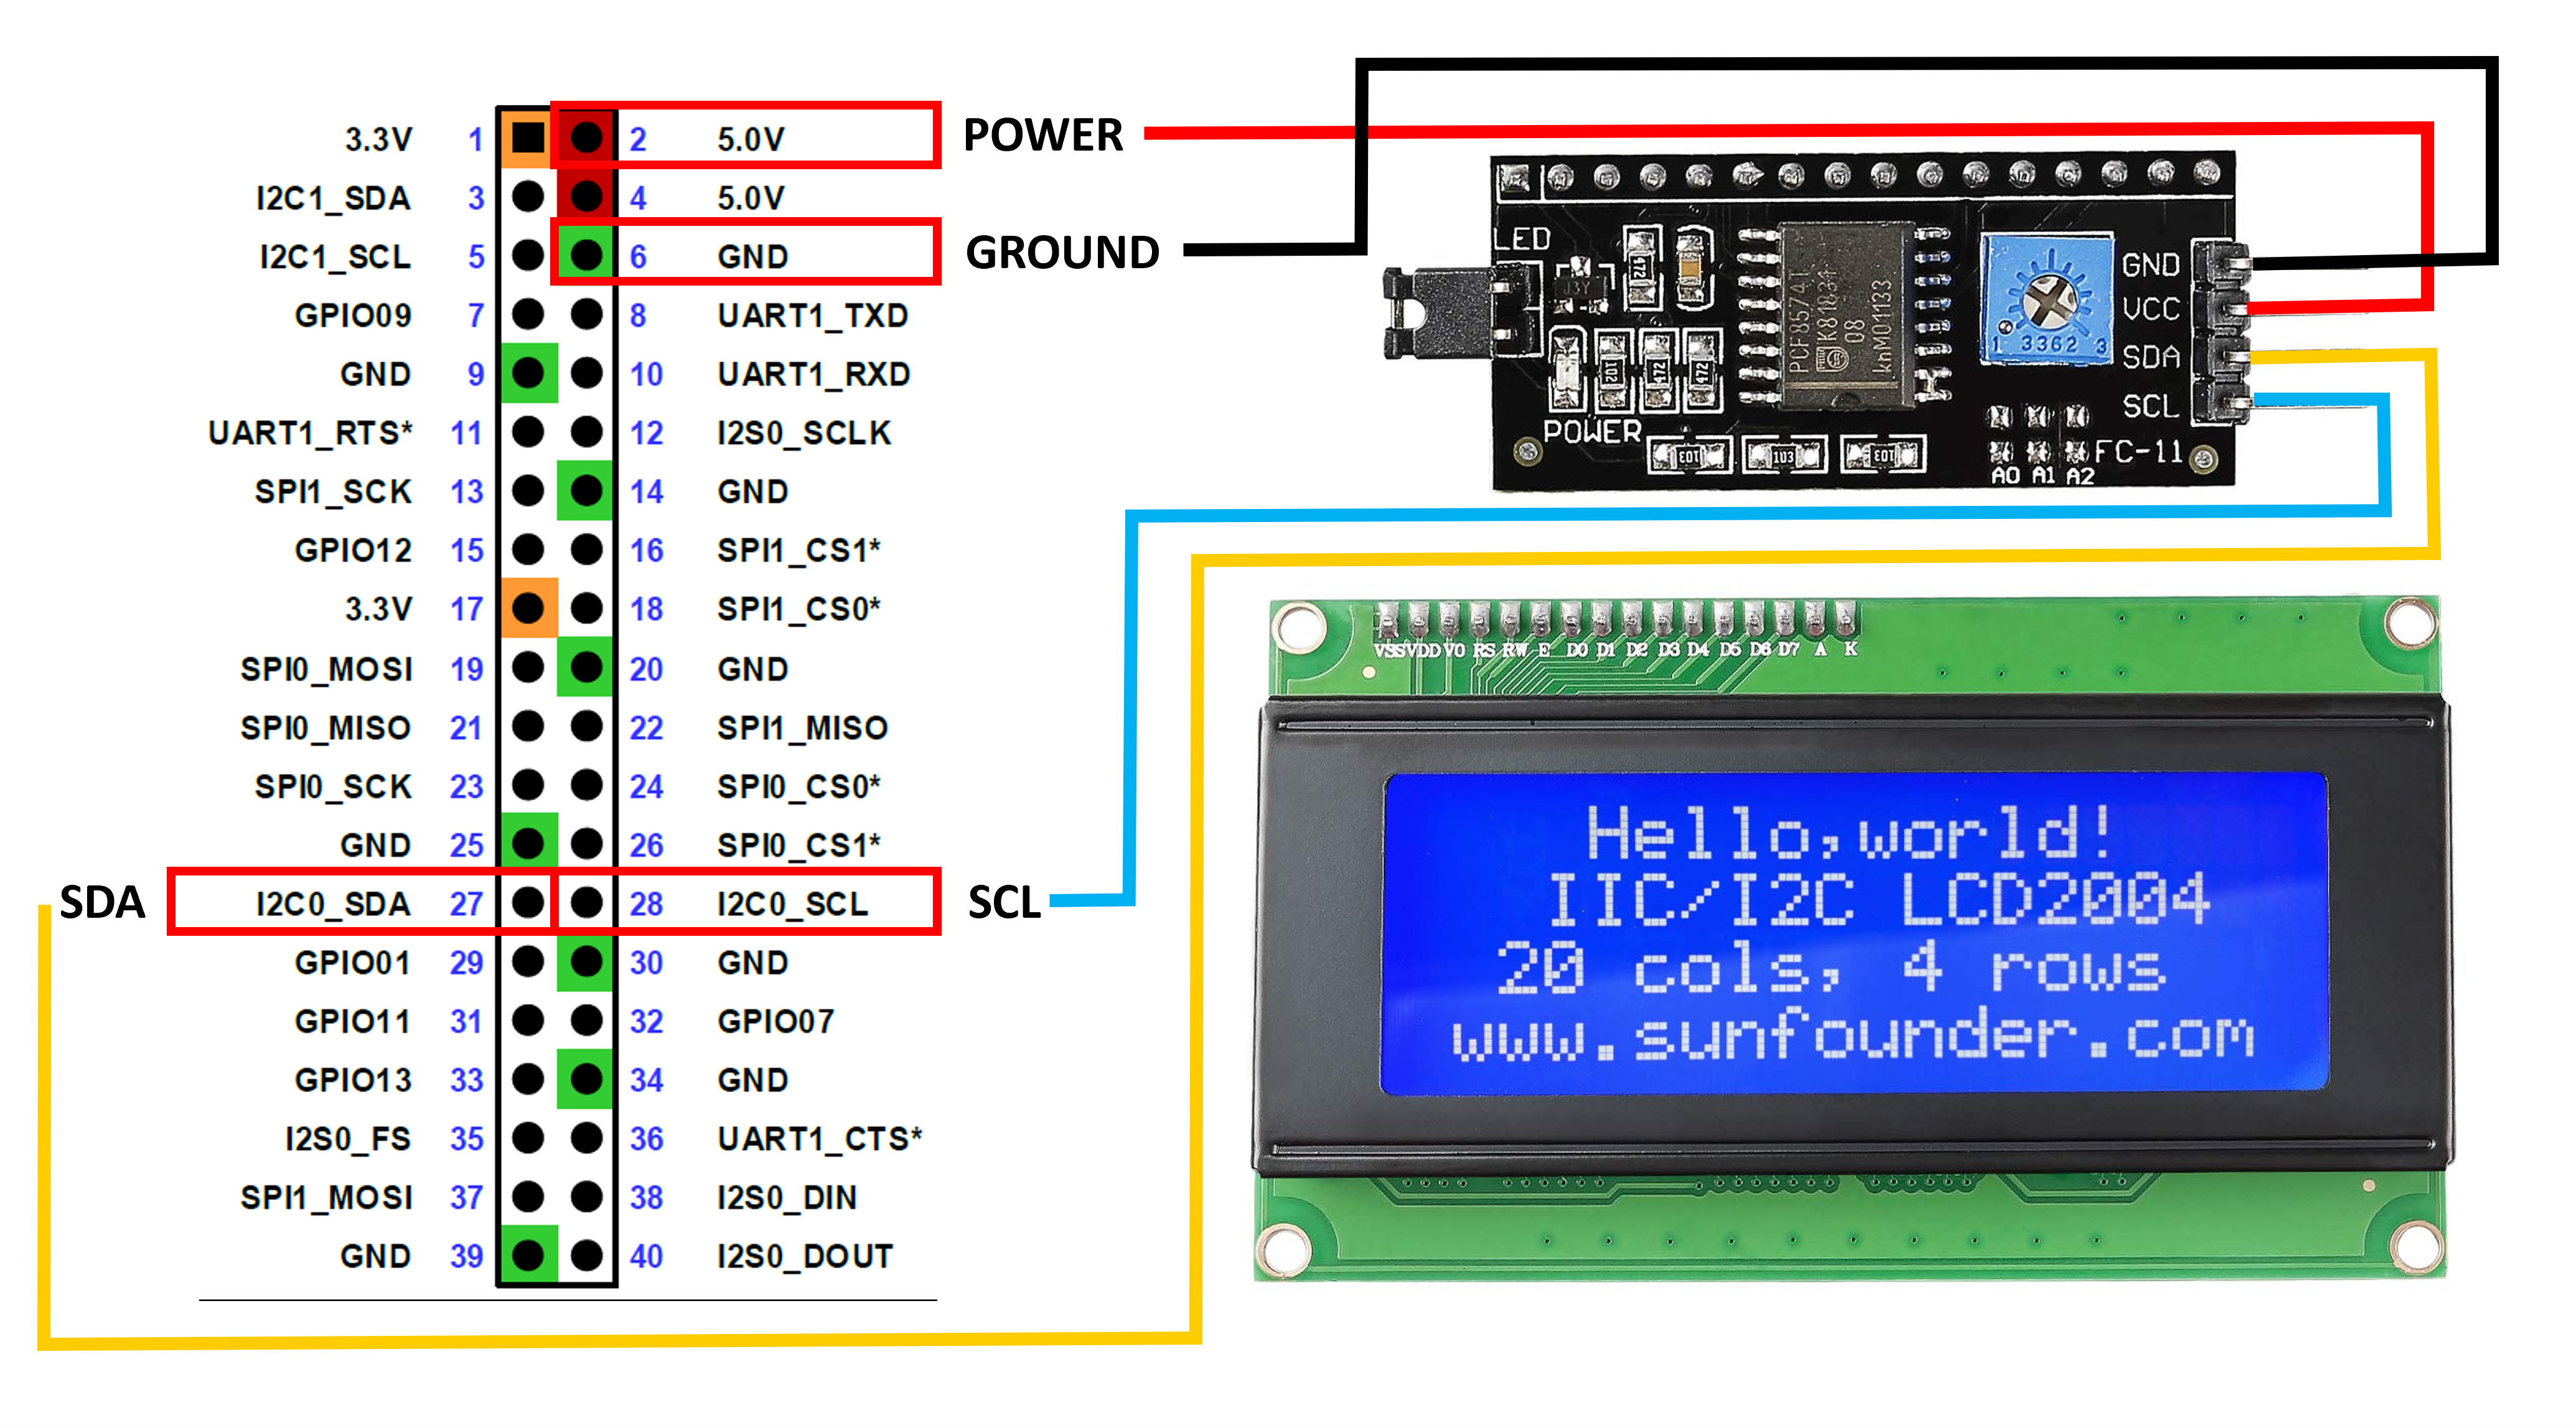
We need to enable the Jetson Nano to communicate with the LCD screen over GPIO. First run the following commands to enable software access.
sudo apt-get update
sudo pip3 install Jetson.GPIO
sudo groupadd -f -r gpio
sudo usermod -a -G gpio <<USER_NAME>>
Power off the Jetson, and unplug from the power source. Use the wiring guide below to connect the LCD screen to the Jetson using jumper wires.
Start ROS nodes automatically
If you named your user something other than
jetsonduring setup, modify the home directory under theExecStartcommand insprout_ros.service.
sudo cp ~/ws/src/sprout_ros/resource/sprout_ros.service /etc/systemd/system/
sudo systemctl enable sprout_ros.service
In order to allow USB devices access on boot, we will need to give permission to unprivileged users.
cd /etc/udev/rules.d/
sudo touch local.rules
sudo nano local.rules
Add the following line into the file.
ACTION=="add", KERNEL=="dialout", MODE="0666"
Reboot the system: sudo reboot now